 Growing up my mom would buy the large pickle jars that you get from Sam’s Club or Costco. I would eat one every day. It was really a special treat for me and my sisters. My son loves pickles too.
So naturally, I knew that we would both enjoy making (and eating) our own homemade pickles. I thought it would be really cool to try to make other pickled veggies too. So I did some research and found that you can pickle just about any kind of vegetable. I decided to make dill pickles and pickled mixed vegetable.
For this project I used pickle cucumbers and root vegetables: yellow beets, parsnips, turnips, carrots, and radishes. There are 8 things you need for this project: Mason jars, pickling spice, sugar, salt, veggies, white vinegar, dill, and water. Below are the steps I took to complete this fun kitchen project.
Step 1: Cut the Veggies
I cut the pickle cucumber in spears. You can cut the cucumbers however you like. I peeled and cut the yellow beets, parsnips, carrots, and turnips. To help my family determine what vegetable they are eating I cut each vegetable a different shape except.
Step 2: Make the Brine
I used 3 cups of white vinegar, 3 cups water, 2 tablespoons plus 2 teaspoon of sea salt, and 2 tablespoon of sugar. Put all ingredients in a saucepan and bring to a simmer. You just want to allow the salt and sugar to dissolve.
Step 3: Put the Veggies into Mason Jars
I start by putting the cucumber spears into their own separate Mason jar. Put enough spears that will fill the jar but you don’t want to over crowd the jar. In the next jar I put in all of the root vegetables. I layered them in the Mason jar as it looks really cool with the colors and shapes.
Step 4: Fill Mason Jars with Brine and Wait
I start to fill the mason jars with the brine mixture. You want to make sure you fill with brine until the vegetables are completely covered. Fill the jars until there is 2 inches from the rim of the Mason jar. Add the tops and put the jars in the fridge for at least 24 hours. You can keep the jars in the fridge for up to 3 months.
Our pickles didn’t last my family devoured them.
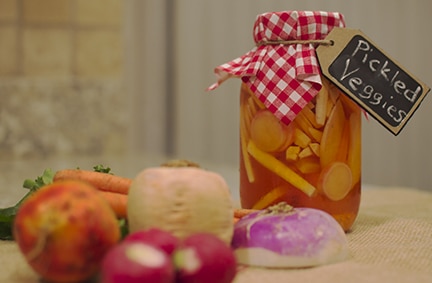
As a surprise, I decided to send some pickled vegetables to some family members as gifts. Once the jars sat in the fridge for at least 24 hours, I put a piece of really cool fabric I found at Joann Fabric on top and wrapped a piece of string to hold the fabric in place. I then used a chalk board tag to label the Mason jar. This project was so much fun and easy to do. Don’t be afraid to pickle just about anything. Enjoy!
Leave a Reply