For some reason, we’d been keeping close to 150 dishes in our cabinets. I’m not including serving platters, pots and pans, bakeware, flatware, etc. I’m talking about plates, bowls, cups, and drinking glasses. Mind you, my household consists of a whopping 3 people. I guess we just never thought we should get rid of any of the dishes. But how did we accumulate so many?
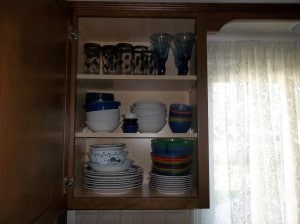
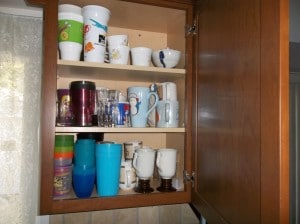
Sarah(my wife) and I combined our dishes when we moved in together; friends and family gave us cute dishes with sayings on them. My son thinks I’m a one in a million dad, and gave me a mug to prove it! That one year I got a cool set of Family Guy glasses for Christmas. We brought back souvenirs from our trips to the Bahamas, Disney World, water parks, etc. Okay, now I get it. Over the years we just collected a bunch of dishes, and other stuff.
So how did we solve this problem?
First, we discussed the problems we were having, as if it weren’t glaringly obvious. Next, we created an action plan; we implemented it, and then bought the necessary kitchen organization tools to get the job done.
Problems We Were Facing:
It never occurred to us to organize the kitchen cabinets. I guess it’s one of those out of sight out of mind things, as cabinets stay closed most of the time. You just don’t think about it much.
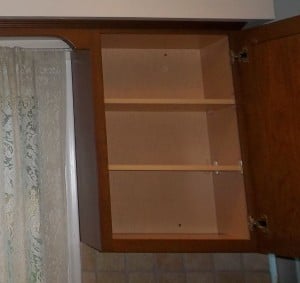
The cabinets were packed with dishes, so much so that we had to lift up bowls to get to saucers and plates. We had cups stacked inside of cups, and dishes hidden on the top shelves we hadn’t seen in years. Two cabinets were used to house our plates, saucers, bowls, cups, and drinking glasses. After going through our cabinets we decided on seven things we would like our kitchen cabinet organization plan to accomplish:
- Cut down on dish washing
- Get rid of mismatch dish sets
- Make space for dish cloths
- Make the cabinets more functional (currently saucers sit on top of plates)
- Consolidate 2 dish cabinets into 1
- Deciliter counters using new cabinet space
- Uniform neat look
Action Plan
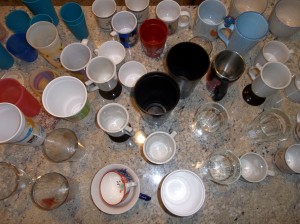
Neither I nor Sarah find it particularly enjoyable washing dishes. That last statement doesn’t begin to fully express the sentiment; loathe, can’t stand, and hate are more honest. So obviously our action plan began with removing all those dog gone dishes from the 2 cabinets. Placing all of the dishes on the counter put things in a different perspective. It was ridiculous.
What We Got Rid Of
We started out with 137 bowls, plates, saucers, mugs, glasses, and cups. First, those plastic cups you get from fast food restaurants had to go. Some were “collectable”, an undercover hoarder’s dream word, while others are junk that some how made it into our cup rotation. Next, we had mugs on top of mugs on top of mugs. Some had chips and cracks but also sentimental value.
Tough decisions had to be made (I love you baby, but that Mickey Mouse mug you got me from your Disney World trip 10 years ago had to go). Cups that were etched and worn; gone. That last glass from that one glass set we bought years ago that somehow survived breakage; out of here. Tweety bird dish set, we didn’t throw it away, but it’s no longer in the dish cabinet. We threw out most of our son’s old plastic Ikea plates and cups.
All of our dinnerware was, well, beat up. They were etched from all the years of knives, forks and spoons colliding with them and some had chips along the edges. We would have to buy new dinnerware one day. What we were left with were practical items, and a sensible few “collectibles” we just couldn’t live with out. I kept my Dad mug.
What We Kept
We were sensible. We kept mostly what we needed and a few items we really wanted. We kept our dinnerware; four plates, bowls, saucers and mugs in the cabinet. Other plates used for food preparation went elsewhere; as we knew we didn’t entertain very often. There are only 3 of us, and when we do throw a party, or invite over guest, we have a formal dinnerware set and paper plates are always an option.
We did keep some extra bowls for food prep, but moved them to the cabinet we store mixing bowls and storage containers. We kept a couple Ikea bowls, plates, and cups for our son, but moved them to an area that he can easily access. I kept my Family Guy drinking glasses, and Sarah kept her Tweety Bird mug. We kept our dessert glasses and our wine glasses, and a set of mugs. In total, we kept 38 dishes for our cabinet.
Arranging Our Cabinets
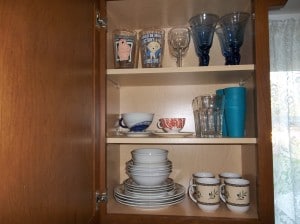
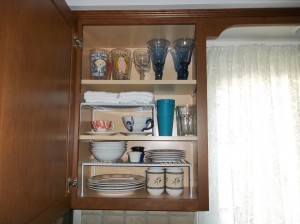
After we cleared out the cabinets and made our tough decisions, it was time to organize the cabinet. We started with the bottom shelf. It would be the best place for our dinnerware set. On the middle shelf we wanted to put our “everyday” glasses and cups, our tea cups and saucers, and drying towels. We knew that they would be used very often, we’re not very tall, and so they should be easily reached.
On the 3rd shelf, we decided to go with the wares that we wouldn’t be using daily but still often enough to justify its position in our cabinet. This included our dessert glasses, wine glasses, and our special Family Guy glasses. Although we came a long way, all our challenges weren’t quite solved yet. We placed all of our dishes in the cabinet and then decided what kitchen organization tools we needed.
Cabinet Organization Tools
Before making any purchase decisions, we measured our cabinet space, then did some research on Amazon. We needed 2 separate organizing units, one for the bottom and middle shelves. We tried several options, before deciding on what would work best for us.
First, we bought an expandable cabinet shelf by Seville. The $20 unit can also be used as 2 separate units. It’s a quality cabinet shelf organizer but it didn’t work for us. Although the Seville fit in the space, it didn’t leave a whole lot of room for the bowls to sit on top of it; we decided against adjusting the shelf height of the cabinet. Using the shelf as 2 separate units wasn’t an option either as just one piece isn’t long enough for the bottom of the cabinet.
Seville which makes their cabinet shelf in a metallic color did not make a medium size unit, at least not one we could find. Which means we would have had to use a different brand, and no other brand we found made theirs in that cool metallic color. We didn’t want to use mismatch colors.
We tried a couple other options. We found the “My Perfect Kitchen” brand at Bed Bath and Beyond, and they offered plenty more options (although not as good looking as the Seville). We purchased a medium and a large unit, as well as a corner shelf. The corner shelf did not work, the other 2 worked perfectly and the combined cost of $13 was less than the Seville unit by itself.
How Long it Took to Organize Our Dish Cabinet
It took us a few hours, including shopping time, to complete this project. This was including the planning and the action. This simple project while small was very beneficial. Admittedly, we probably could have taken less time to complete this endeavor, but we really wanted to be sure we reached our goals.
We wanted to make sure we exercised all of our options, because this was such a big deal for us. We will no longer spend a lifetime washing dishes. No more trying to negotiate with the cabinets to accept more dishes. No more cluttered messiness. This project cost under $13, and of course we returned items we could not use.
Take Aways
If you do decide to organize your kitchen cabinets, here are some kitchen organization tips:
Perform a “Walk through”
Look at your cabinets and decide what you would like to change. Before you start throwing stuff away, put pen to paper. What do you plan to accomplish? How is this going to improve your life? What do you need to purchase to accomplish your goals? Use a site like Amazon to review your cabinet organizer options, the reviewers are usually unbiased and objective.
Organize 1 or 2 Cabinets at a Time
Start with the cabinets that will give you the greatest benefit once organized. For us it was the cabinets we used for our dishes. Some people would take everything out of all of there cabinets all at once. That just wouldn’t work for us. That would make things harder in my opinion. Frustration would set in after a little while. It’s best to start small and do what you can handle. Do not overwhelm yourself when starting a kitchen organization project.
Do Not Rush
As stated above, we could have completed this project in half the time, but we had specific goals we wanted to hit. We went through every item in our cabinet. We actually thought about and wrote down our goals for this project. Because we took our time, we ended up reaching our goals.
Make the Tough Decisions
This is your space, but if you want function, there are some things you might have to get rid of. You know that Hunger Games “Collectible” cup from McDonalds or were it Burger King, yeah; you might have to get rid of that if you want to de-clutter your cabinet.
Some items we got rid of had sentimental value, but were not practical. Other items were too important to throw away. We decided to limit our dish space for our family of 3 to just 1 cabinet. To achieve organized kitchen cabinets we had to make tough decisions.
Measure Your Space
Before you head out to the store and especially if you order online, make sure you measure the space first. Kitchen cabinet organization units come in different dimensions. Make sure you get one that will work for you. Even when you measure, however, you won’t truly be able to decide what works for you until the organization tool is in place.
Stay Practical
We could have kept the Seville cabinet organizer, and adjusted the cabinet shelf heights just to have the look we wanted. We could’ve bought another Seville unit for the second shelf, but when we reflected on our lists of goals, “cool metallic color organizer shelf” wasn’t there. We would have spent 3 times the money just to have that “cool” color; it wasn’t worth it.
Budget
When you go to the store or shop online, there will be options that are fancier and better looking than what you need. If your goal isn’t to be frugal, then have fun, buy whatever you want. But if you are on a tight budget, do your research and plan accordingly. We found our solution for around $13 all together.
Spend Money Last
Before you go out and spend money on a bunch of organizers and unnecessary silly stuff put your space together. Place everything in the cabinet the way you want it to be before you spend a penny. Be minimalist, think “what do I really need?”, and “what can I do with out?”, and of course, always save your receipts.
Final Thoughts
Overall this was a great experience. This was a positive change, and a drastic one at that. We got to see how something that seemed to be so simple made a huge impact on our lives. We are not organization experts and we are not perfect. We may add or remove dishes as we see what works best for us. We have a simple set up, and it works for us for now. We are now much more disciplined about washing dishes; we have to be.
We rinse out dishes after we use them (for the most part) and don’t wash as many dog gone dishes any more. All dishes easily fit in the cabinets so there is no need for them to sit in the dish rack all day. We don’t spend hours after work washing dishes. It certainly isn’t as much of a chore as it once was. We will apply what we learned from this undertaking and apply it to other organization projects in the kitchen and in the rest of our home.


Leave a Reply