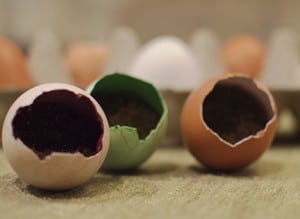
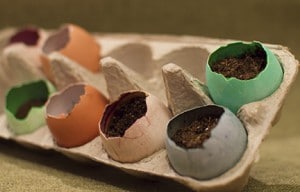
I started this project because I wanted to do an educational green project that my son could help me out with. I took a look around pinterest and I decided that we would plant some herbs and grow a kitchen herb garden.

What better way to have fun and learn in the kitchen than to make a kitchen herb garden? I wanted to find a planter I could use that would decompose once the plants got bigger.
After looking around, I found egg shells would be a perfect planter for the seeds and they would also decompose and provide added nutrients, so there would be no need to throw out the egg shells.
Every time I made eggs for breakfast I saved the shells. I wanted to also find a way to give my kitchen a splash of color, so I decided to dye the eggs and use natural dyes. This project turned out great, and I’m really excited to share this with you. My creative gears were really turning, and below are the steps my son and I used to create our kitchen herb garden.
Supply List
- Eggshells
- Egg carton
- Herb seeds
- Spray bottle
- planting soil
- Natural Dye (see step 3)
- Vinegar
- Water
- Bowls or Other Containers
Step 1: Crack the Eggs
I used large eggs in this project. You shouldn’t use anything smaller than large eggs since you need to have a good amount of space for the seeds and soil. One by one, I took the eggs and hit the narrow sides against the countertop. I didn’t hit the egg too hard because I didn’t want the whole shell to break. I used my fingers to peel off some of the shell until I got a nice opening. I emptied the eggs into a bowl to use later in a meal. Once you have created a nice opening you want to rinse out the egg shells.
Step 2: Make a Drain for the Egg Planter
You want to grab a pin, needle, or an awl. I didn’t have any of those things so I used my meat thermometer. It worked perfectly. Anything that is sharp at the end and long enough to fit inside the egg shell should work fine. What you want to do is hold the empty egg shell on the countertop with the opening facing up.
Put the pin, needle or other pointy object inside of the egg and press. You want to create a small hole at the bottom of the egg planter. This will allow the water to drain out of the egg, and prevent your plant from drowning.
Step 3: Make Natural Dyes
This was the longest step. I wanted to find a way to color my eggs while using a dye that is natural. I’ve always heard of natural dyes, but I never really explored it until now. So I started doing some research and found some fruits and vegetables that would be great to use as a natural food dye. In my research I determined what colors I wanted and colors I can actually make.
Sure you can purchase natural food coloring[link to amazon] online but I didn’t want to spend money on coloring when there is a way to make it homemade. Especially when I can use some fruit or vegetable to create the color. My favorite color is yellow so of course that was a color I wanted. I chose red, blue, green, and yellow.
- Making Yellow – There are a few different things you can use to create the color yellow. You can use saffron, fresh turmeric juice, or ground turmeric. I chose ground turmeric. I mixed 1 teaspoon of ground turmeric with 1 cup of water and 1 teaspoon of white vinegar. You can add as much turmeric that is needed to get the color you are looking for. Start with a little and increase it if you see it’s just not the right shade you want.
- Making Red– For red you can use beet juice, beet powder or pomegranate juice. I made my own beet juice, I peeled a beet and put it in my blender to make beet juice. I strained the beet juice to remove any pulp. I got about ½ cup of beet juice from the beet. I added 1 teaspoon of white vinegar to my beet juice.
- Making Blue – For blue you can use red cabbage or blueberries. I had blueberries so that’s what I used. I put the blueberries in my blender and strained it to remove any of the skin.
- Making Green – For green you can use spinach juice, spinach powder or parsley powder. I used spinach and put about 1 cup of it in my blender. I also strained it to make sure all the pulp was removed. I added 1 teaspoon of white vinegar to the spinach juice. I found that the green wasn’t taking very well. So I ended up adding a few drops of food coloring I had in my spice cabinet (you can find it in the baking aisle at the grocery store).
All of the natural dyes worked well, except for the spinach for green. Next time I’ll try parsley or spinach powder.
Step 4: Color the Eggs
Now that the colors are created place each color in a cup or bowl. Put the empty egg shell in the coloring and let it sit for about 10-15 minutes. If you haven’t reached the color you want leave the egg shell in the cup or bowl for another 5-10 minutes or until you really have reached the color you are looking for.
Step 5: Dry the Eggs
Once you received the color you are looking for you need to let the egg shells dry. I used a recycled grey egg carton to hold the eggs. It’s perfect because that is the same carton the eggs came in. I didn’t want to use the yellow egg carton because I didn’t want to take away from the beautiful colors I have just created. Feel free to use whatever you have on hand. I dried the egg shells for about 1 hour before I could use them.
Step 6: Add the Soil
Now that the egg shells are dried it’s time to have some more fun. I put about 2 teaspoons of potting soil. Then I used my spray bottle to wet the soil a little bit before adding the seeds.
Step 7: Add the Seeds
Depending on what seeds you are going to use will determine how deep the seeds need to be in the soil. Read the instructions on the seed package to be sure. I put 5-8 seeds in each egg shell. Then I put another teaspoon of soil to cover the seeds. Then I sprayed the soil with water.
Step 8: Watch Your Garden Grow
Last step is to put the beautiful colored egg shells on a shelf/window sill or counter space with plenty of sunlight and watch your herb garden start to grow.
Things to Keep In Mind…
- Make sure your herbs have plenty of sunlight
- Water as needed
- Give it a little time before expecting your herbs to sprout
- The colors might not be as deep or saturated as you would get using store bought dyes
This turned to be a very fun project. It’s easy to get kids involved in this because it’s really fun and educational. If you give this a try pretty soon you will have your own little kitchen herb garden. Below are some more photos.
The red showed up really well on the on the inside of the egg.

I was really surprised at how good the blue turned out.


What a cute idea! And what better time to post this than right before we have all those Easter eggs and dye lying around? I might just have to try this! Thanks!
This is a neat idea and I think my granddaughter will like this. Thank you!